

Bouchon Croissants
When Dustin bought me the Bouchon Bakery cookbook we had no idea we'd be living so close to a real deal Bouchon Bakery. There's one located in Beverly Hills, and we definitely plan on eating there frequently. The bistro's steak frites (and probably everything else, however we wouldn't know since we've only ordered the steak frites) are also delicious. We ate there once in Vegas and again with D's mom when she visited, and our stomachs have definitely left happy! Since we now live so close, maybe it's not quite as exciting as when we were living in Seattle, but freshly baked, homemade breads are always a cause for celebration. We did think that baking our way through the cookbook could be a fun way to spend our weekends together. With money tighter living in Los Angeles, we are definitely trying to think of good, cheap date ideas, and we are both interested in learning how to make legit homemade bread. Nothing tastes better than fresh homemade bread. So expect more Bouchon recipes in the future.
Croissants were first on the list for me. I had this beautiful, magical notion of us making perfect homemade croissants together, eating them fresh, flaky, and buttery straight from the oven and looking as though they came from Bouchon. We knew it would be a lot of work, but what we didn't know was just how important the technique would be for them to end up with the perfect layers we have come to expect from croissants. You have to do so many turns of the dough, be very exact when measuring sizes, and probably most importantly keep the butter and dough the same temperature. No melting butter seeping through the dough!
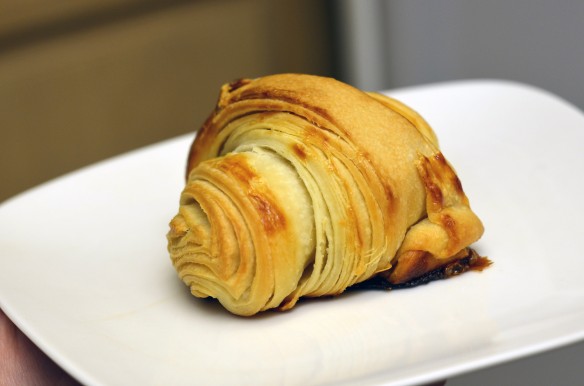
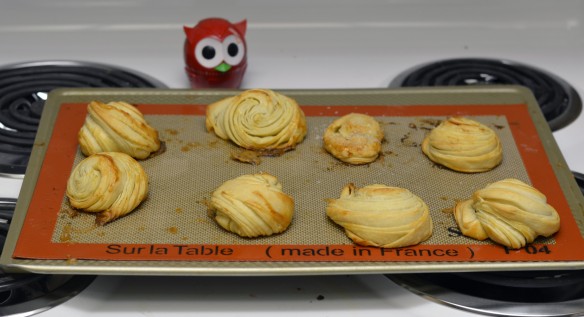
We got some great buttery layers in our croissants, but somehow our dough didn't end up light enough. It was too dense and heavy to be a true croissant. It tasted more like an upgraded version of a Pillsbury crescent roll than a croissant from a French bakery. They still tasted great (even if they looked more like funny pinwheels since we couldn't seem to get them to stick together in the oven to bake up like croissants in most cases), but we will definitely have to try a second time to perfect the art, maybe altering the recipe, working more carefully to follow instructions, or possibly both. I read online that perhaps we did not let them proof long enough or at the correct temperature. Or there is the possibility that there was something wrong with our dough itself— like maybe our poolish wasn't quite right? Or the fact that we stored it overnight in the fridge before letting it proof since we wanted to eat croissants for brunch rather than dinner, which would happen if you made them start-to-finish in one day (although some other recipes I read claimed storing in the refrigerator to let the dough mature was crucial in developing flavor). They also didn't brown quite like we expected them to, but that could be the result of not being baked in a convection oven, which is traditional according to Bouchon.
One thing our croissants lack is diastatic malt powder in the dough, which Bouchon calls for. Diastatic malt powder (aka malted barley flour) gives bread that little something extra in terms of flavor. However, I searched high and low at all of the grocery stores near us, and not a single one had it in stock. I would have either had to order it online (too expensive and it would take too long to get here) or go to a home brewing store for beer, which I looked into doing, but the only one close enough to us to realistically hit up was closed as they were moving to a new location. Even though I struck out in locating it, plenty of croissant recipes online didn't call for it, so I knew croissants may be made without it. Perhaps that might have had some impact on the quality of our croissants, but I really think it had something to do with technique. However, with all of the bread baking we plan on doing, I probably will invest in this little ingredient.
A couple of notes: (1) make sure to make sure to roll out the dough to the proper sizes or else you will get mini croissants, which are much harder to shape than the bigger ones. Yes, bigger ones have a ridiculous amount of butter, but if you are making homemade croissants, I'm not sure what else you are expecting! Go big or go home! We were a little lazy measuring thinking it wouldn't matter, but it did. (2) Use good high quality European butter because butter is the star of the croissant show. We actually got some great butter from the farmer's market for free when the vendor was having a special if you purchased two blocks of cheese. (3) Bouchon's cookbook includes both weight and standard measurement amounts. While I normally just do standard measuring because I find it easier and have always had great success with my baked goods even if weighing is better for accuracy, for this recipe I pulled out the kitchen scale and and weighed everything. If you use the standard measurements, you end up with a lot of 1/4 cup + 2 tablespoons + 2 teaspoons kind of instructions which seemed like more of a pain in the neck than dusting off the scale.
I've done my best to replicate the Bouchon instructions, but there really is no substitute for the book with all its fabulous pictures, tips, and precisely worded instructions. Worth the purchase if you are interested in bread making.
You should also know Dustin broke my cute Anthropologie rolling pin handle by pressing too hard and not knowing how to use a rolling pin properly. You should give him a hard time for that ;)
Bouchon Croissants
yields ~16 croissants
Poolish
- 100 grams (1/2 cup + 3 tablespoons + 1 teaspoon) all-purpose flour
- .1 grams (1/32 teaspoon) instant yeast
- 100 grams (1/4 cup + 2 tablespoons + 2 1/2 teaspoons) water (75°F)
- Combine the flour and yeast together in a medium sized bowl with your fingers.
- Add in water and mix until completely combined to the consistency of pancake batter.
- Cover the bowl loosely with plastic wrap and let sit on counter at room temperature for 12-15 hours.
- When the yeast exhausts its food supply, it is ready to use. It should look like there are cracks towards the center.
Butter Block
- 330 grams (11.6 ounces) European-style butter, slightly softened
- Place a sheet of parchment paper on a flat working surface.
- Place the butter on the paper along with another sheet of parchment paper.
- Pound the butter with the rolling pin, then start rolling it out until you have a 6 3/4" x 7 1/2" rectangle . Wrap tightly with parchment paper and store in the fridge.
Dough
- 500 grams (3 1/2 cups + 1 tablespoon + 1/4 teaspoon) all-purpose flour
- 75 grams (1/4 cup + 2 tablespoons + 1/4 teaspoon) granulated sugar
- 10 grams (1 tablespoons) instant yeast
- 3 grams (1 teaspoon) diastatic malt powder*
- 200 grams (3/4 cup + 1 tablespoon + 1 3/4 teaspoon) water (75°F)
- 100 grams (3.5 ounces) unsalted butter, room temperature
- 15 grams (1 tablespoon + 2 teaspoons) salt
- 1 egg, for egg wash
- Spray a large bowl with nonstick cooking spray.
- Combine the flour, sugar, yeast, and malt powder on low speed in the bowl of a stand mixer.
- Pour approximately half of the water around the edges of the poolish to loosen it from the bowl. Dump the contents of that bowl along with the water, reserving approximately 1/4 cup of the water.
- Add the butter and mix for several minutes until thoroughly combined.
- Add the salt and mix for another several minutes until dissolved.
- Add the reserved water very slowly if dough feels dry.
- Mix on low speed for 20 minutes.
- Remove the dough from the bowl and place on flat work surface.
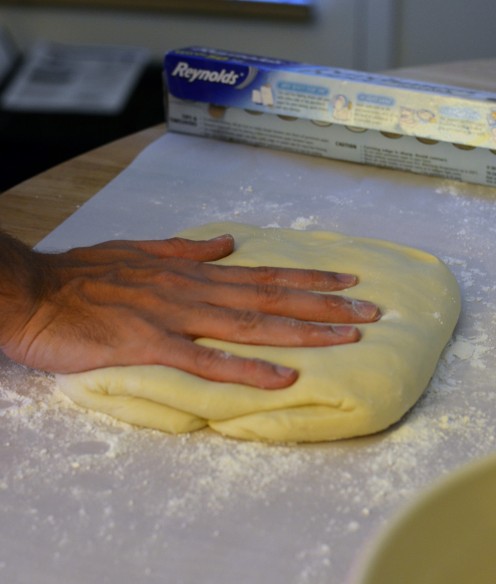
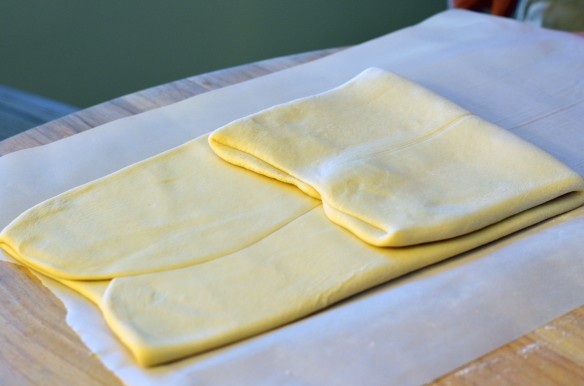
- Stretch the left side of the dough out and fold it to the center, as if you were folding a letter. Shape the dough into 10" x 7 1/2" rectangle. Transfer to sheet pan, cover with plastic wrap, and freeze for 20 minutes.
- Sprinkle work surface and rolling pin with flour. Place dough on work surface, sprinkling the top of the dough with a light layer of flour. Roll the dough outward, fluffing it every so often and flouring, so the dough is not sticky. When done rolling you should have a 16" x 7 1/2" x 1/2" rectangle.
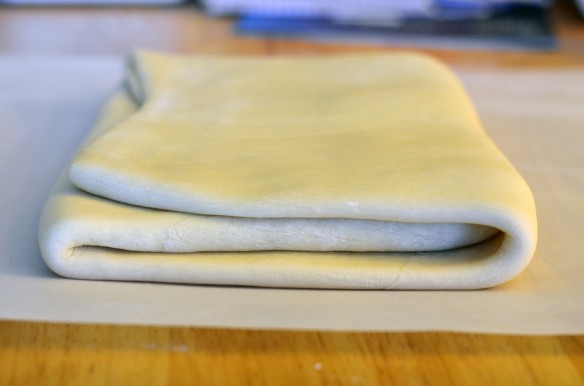
- Place the block of butter on the center of the dough. Fold the longer sides over so they meet in the middle. Press to seal. The only exposed butter should be on the sides.
- Roll the dough across the seam from one side to the other, flipping and fluffing, until you have a 22" x 9" rectangle. Fold the bottom third of the dough up as if folding a letter, then fold the top third to cover the bottom third. Rotate the dough 90º, so it looks like a book (opening on the right). You can mark this as the first turn by lightly pressing one finger into the top corner of the dough. Return to sheet pan, cover in plastic, and freeze for 20 minutes until dough is stiffened, but it should not be hard.
- Repeat step 12 two times, working quickly but making sure not to expose the butter. Mark the dough with 2 then 3 fingers, respectively.
- Line sheet pan with parchment paper. Lightly dust work surface with flour and roll out to 24" x 9".
- Cut the dough in half in order to create two 12" x 9" rectangles. Place parchment paper between rectangles, cover with plastic wrap, and freeze for 20 minutes.
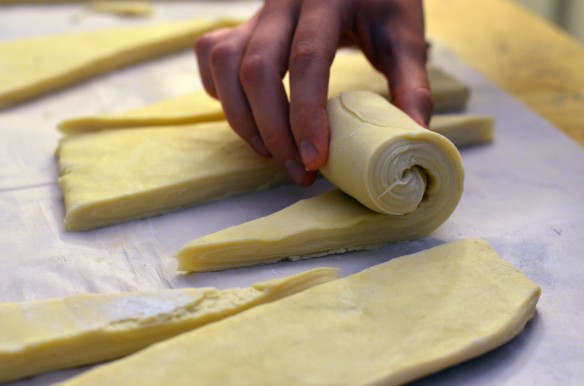
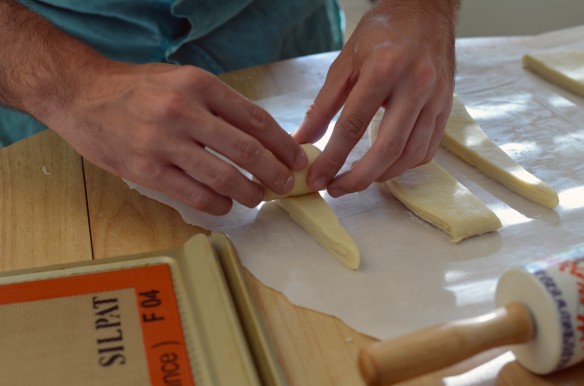
- Working with one rectangle at a time, roll the dough out to a 19" x 9" rectangle. Measure 3 1/2" from the bottom edge of the left side and cut from here to the top left corner of the rectangle. Measure 3 1/2" from the top of the dough, then cut straight down, alternating between the two until you have 8 equal triangles.
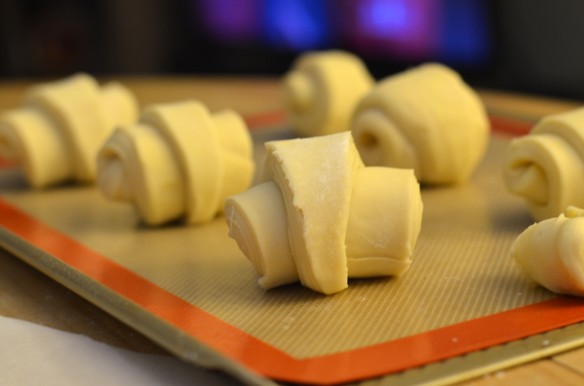
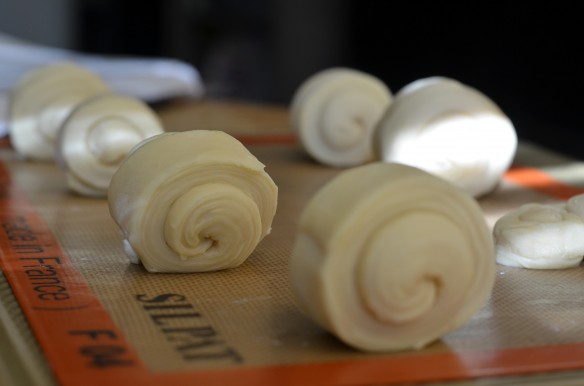
- Gently stretch each dough triangle until it is about 12" long. Place the dough in front of you then (base of the triangle close to you). Fold the bottom corners to the center, and roll up from the wide end to the tip.
- Place on baking sheet, tail side down (so they don't unroll...although we didn't have much success with them staying this way). Repeat step 17 and first part of 18 until all triangles are shaped and spaced out on the baking sheet.
- Repeat steps 16-18 with second rectangle.
- Brush the shaped croissants with egg wash (lightly beat the egg in a small bowl to make) and allow to proof for at least 2 hours (when pressed with a finger, the dough should NOT bounce back). Once proofed, brush with another layer of egg wash.
- Position racks on top third and bottom third of oven. Preheat the oven to 350°. Bake for 35-40 minutes, switching racks and rotating halfway through. The tops should be golden brown when done.
- Allow pans to cool on wire rack before eating.
Best served on day 1, leftovers can be individually wrapped in plastic and frozen for up to a month. To reheat, defrost frozen croissants in the refrigerator (still wrapped in plastic). Place on baking sheet and bake for 5 minutes on 325º to freshen up.
*As mentioned in the previous paragraphs, this was omitted for us, but if you can get it, the addition is highly recommended.